Build this site: A walkthrough to build this website from scratch!
If you wish to make apple pie from scratch, you must first create the universe - Carl Sagan
Follow these steps to build this website yourself. This is a work in progress, and as the website evolves, I will be adding and modifying these instructions.
Table of contents
Chapter 1: Preparation
Prerequisites
This guide assumes that you:
- have Node installed on your computer
- a Git account with one of the popular providers - GitHub, GitLab or Bitbucket
- are familiar with creating Git repositories
- have set up your computer to securely communicate with your Git provider (i.e. you can run
git cloneorgit pushsuccessfully, for example) - have a basic understanding of HTML, CSS, Javascript and Markdown
Setup
-
Install Gatsby CLI:
$ npm i gatsby-cli -
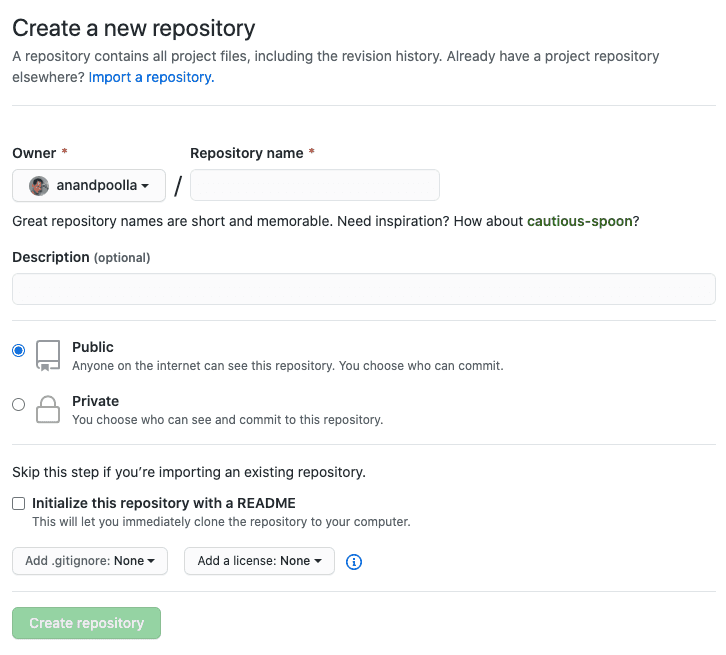
Create a new Git repository for your site, for example:
Do not initialize the repository at this time, we will do that later.
-
Clone the repository:
$ git clone git@github.com:<org>/<repo>.git -
Create a Gatsby site in your local repository:
$ gatsby new <repo>Use exactly the same name as your Git repository (without the .git extension). This will only work if your repository folder is empty (which is why we did not initialize our repository.)
-
You can add the README.md, LICENSE.md and .gitignore files now
Note: Gatsby repo comes with a README.md file that you can just wipe out and rewrite.
-
Commit all your changes:
$ git commit -am"Initial commit" -
Initialize your remote repository:
Since your remote Git repo does not have any branches yet, we cannot simply push your local changes. We need to set up remote.
$ git push -u origin masterThis is a one time step; next time, simply
git pushwill work. -
You now have a funtional Gatsby site setup locally and in a remote Git repository. Change into your
folder: cd <repo>and run the site:
gatsby developOpen a browser and go to
http://localhost:8000to view your site.
This completes the preparation. Congratulations! Have some cake to celebrate!
Chapter 2: Gatsby Basics
Gatsby provides some very useful scaffolding and features for the React application. For example, instead of having to
learn React Router and wiring it all up, you can simply create a new page in the pages folder, and it automatically
becomes a navigable route in the browser.
You will find a plethora of Gatsby starter sites in the marketplace, but my advice is to use vanilla Gatsby (we already did this in step 4 above) to learn the ropes and avoid unnecessary bloatwares.
Setup
Even vanilla Gatsby comes bundled with a lot of features and demo content. Time to clean that up!
root > package.json
Customize package settings:
{
    "name": "mywebsite.com",
    "private": false,
    "description": "My personal website built on Gatsby, React and Netlify",
    "version": "0.1.0",
    "author": "Your Name <yourid@email.com>",
    "repository": {
        "type": "git",
        "url": "https://github.com/<org>/mywebsite.com"
    },
    "bugs": {
        "url": "https://github.com/<org>/mywebsite.com/issues"
    }
}
root > gatsby-config.js
Similarly, customize:
module.exports = {
    siteMetadata: {
        title: `Your website title`,
        description: `Describe your website`,
        author: `Your Name`
    },
    {
        resolve: `gatsby-plugin-manifest`,
        options: {
            name: `Your Name`,
            short_name: `Your Short Name`,
            start_url: `/`,
            display: `minimal-ui`,
            icon: `src/images/youricon.png` //windows .ico files don't work here
        }
    }
}
Clean Up
Under src > pages get rid of:
page-2.jsusing-typescript.tsx
Now would be a good time to edit the standard src > pages > index.js file and customize any home page messages to your
liking.
root > src > components > layout.js
This component is unique (just like all the other components); we use it in all the pages, so that we get a standard
look and feel throughout our website. For now remove the <div> tag with the style property and feel free to customize
the contents of the <footer>.
Layout component imports layout.css, we will do all of our styling there for simplicity and elegance.
root > src > components > header.js
Get rid of the style property in the <header> and <div> tags. Also replace the {siteTitle} inside the <Link>
tag with your preferred title.
Gatsby Routing
Create a new file in the root > src > pages folder and give it a name, let's say movies.js for a page about the
movies you love!
Open the file and add this code to it:
import React from "react";
import Layout from "../components/layout";

export default function Movies() {
  return(
    <Layout>
      <h1>My top five movies are:</h1>
      <div>
        <ol>
          <li>The Matrix</li>
          <li>Interstellar</li>
          <li>Jurassic Park</li>
          <li>Dark City</li>
          <li>Flight of the Navigator</li>
        </ol>
      </div>
    </Layout>
  );
}
Save it, navigate to http://localhost:8000/movies and voila! Your page is ready to see! You can create any number of
pages this way. Now let us make navigation between pages easy.
To be continued...
Chapter 3: Gatsby Markdown
One of the best reasons to use Gatsby, to build this website, is that all your blog posts (yes, like this one) can be written in Markdown.
Setup
First we will grab some plugins that we will need for the blog:
# Allows Gatsby to read local markdown files
npm i gatsby-source-filesystem

# Extract content of markdown files for processing
npm i gatsby-transformer-remark

# Handles markdown images
npm i gatsby-remark-images

# Creates links for headers so we can have a table of contents
npm i gatsby-remark-autolink-headers

# Markdown code formatting; comes with themes
npm i prismjs gatsby-remark-prismjs
gatsby-config.js
We need to configure the plugins we just installed:
{
    resolve: `gatsby-source-filesystem`,
    options: {
        name: `content`,
        path: `${__dirname}/content` //this is where we will store the blog markdown files
        }
},
{
    resolve: `gatsby-transformer-remark`,
    options: {
        plugins: [
            `gatsby-remark-autolink-headers`,
            {
                resolve: `gatsby-remark-prismjs`,
                options: {
                    classPrefix: "language-",
                    inlineCodeMarker: null,
                    aliases: {},
                    showLineNumbers: false,
                    noInlineHighlight: false,
                    languageExtensions: [
                        {
                            language: "superscript",
                            extend: "javascript",
                            definition: {
                                superscript_types: /(SuperType)/,
                            },
                            insertBefore: {
                                function: {
                                    superscript_keywords: /(superif|superelse)/,
                                },
                            },
                        },
                    ],
                    prompt: {
                        user: "root",
                        host: "localhost",
                        global: false
                    },
                    escapeEntities: {},
                }
            },
            {
                resolve: `gatsby-remark-images`,
                options: {
                    maxWidth: 1024
                }
            }
        ]
    }
}
More content coming soon...
